


OptiMonk holds significant importance for campaigns and business strategy. It offers powerful conversion optimization tools, allowing businesses to increase their conversion rates and achieve better results.
✅ With features like personalized campaigns and advanced targeting options, OptiMonk enables businesses to deliver tailored messages and offers to specific visitor segments, resulting in higher engagement and conversion rates.
On the other hand, a webhook is a way for applications to send real-time data to each other. It uses HTTP POST requests to send information when specific events occur.
✅ Webhooks enable instant data transfer and are commonly used for integration, automation, and triggering actions based on events. They facilitate seamless communication between applications and allow for efficient data synchronization.
The Integration of OptiMonk and Webhook
To integrate your OptiMonk campaigns with Webhook, you can follow these steps:
1. Log in to your OptiMonk account.
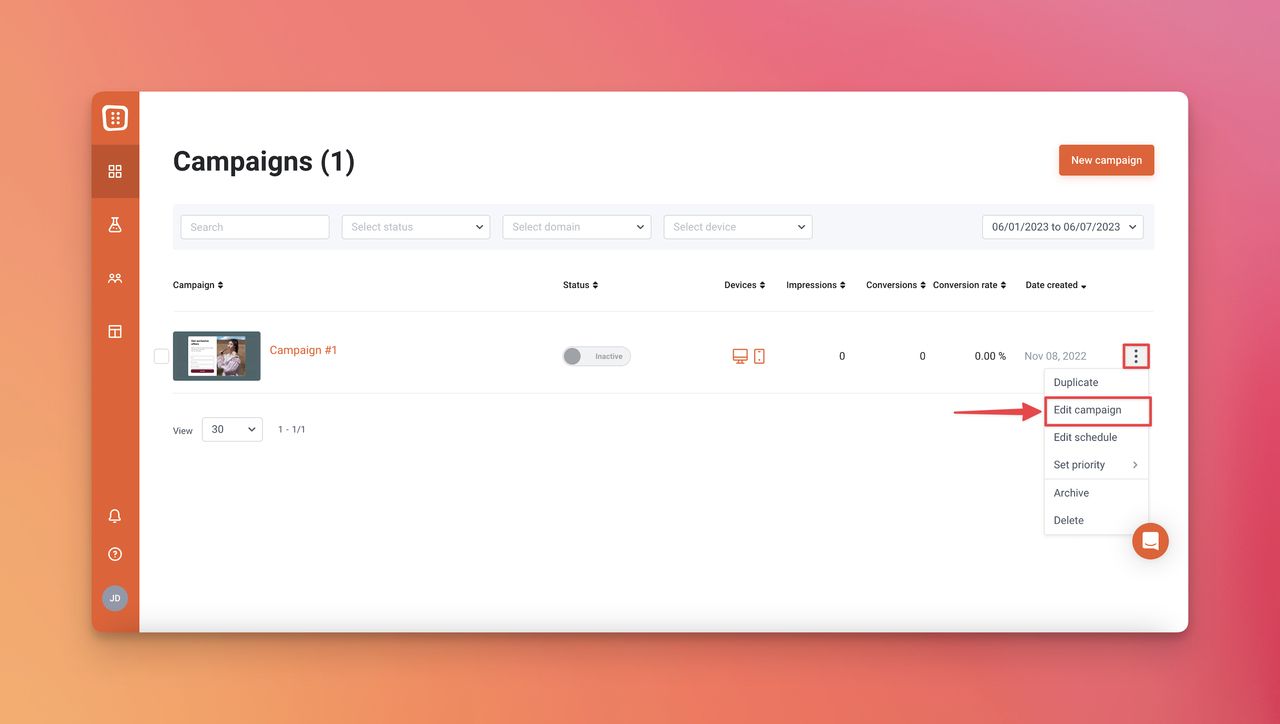
2. From the left menu, select "Campaigns" and choose the three-dot on the current campaign to "Edit campaign."
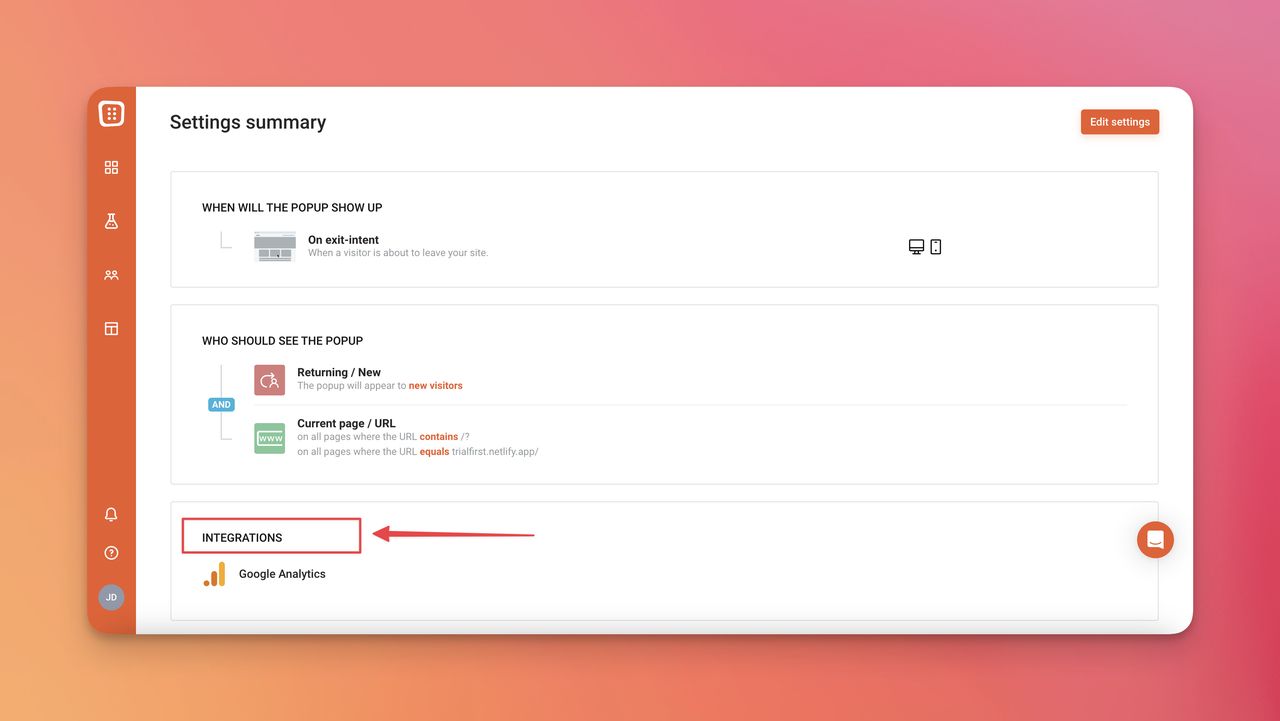
3. Viewing the details of the campaign, scroll down and find "INTEGRATIONS" to click.
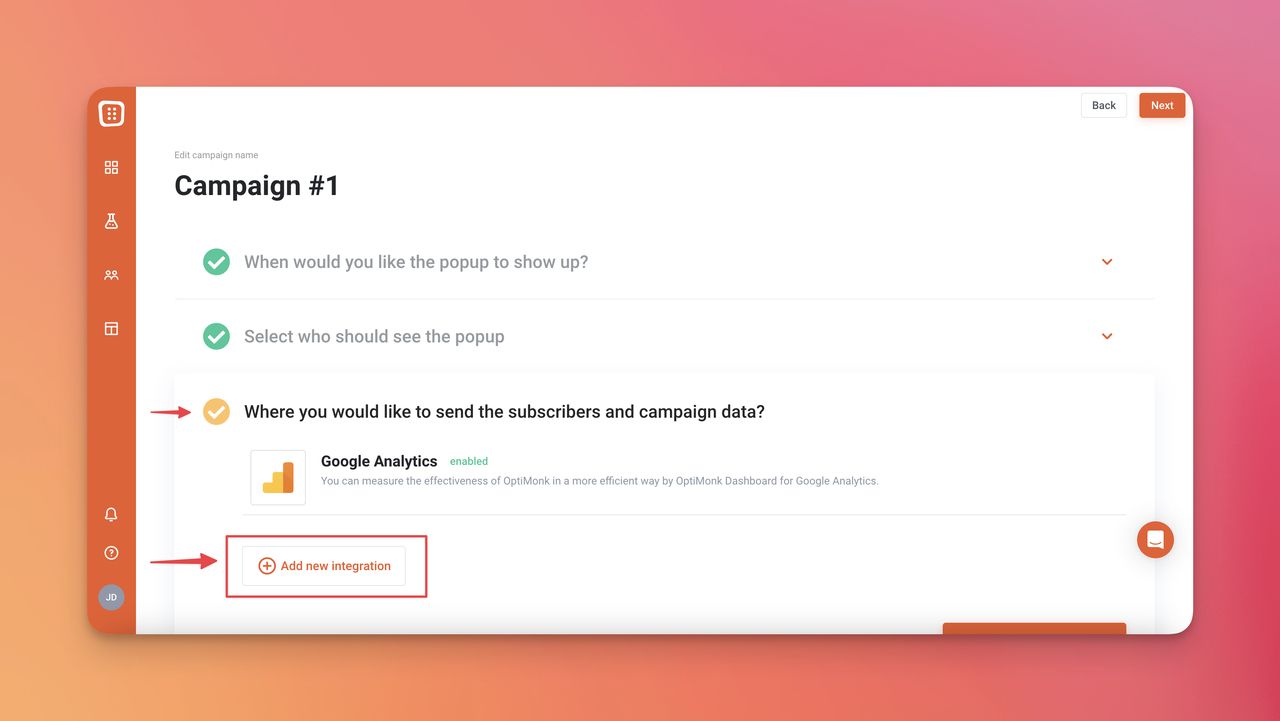
4. The next step is to reach "Where would you like to send the subscribers and campaign data?", and click on "Add new integration."
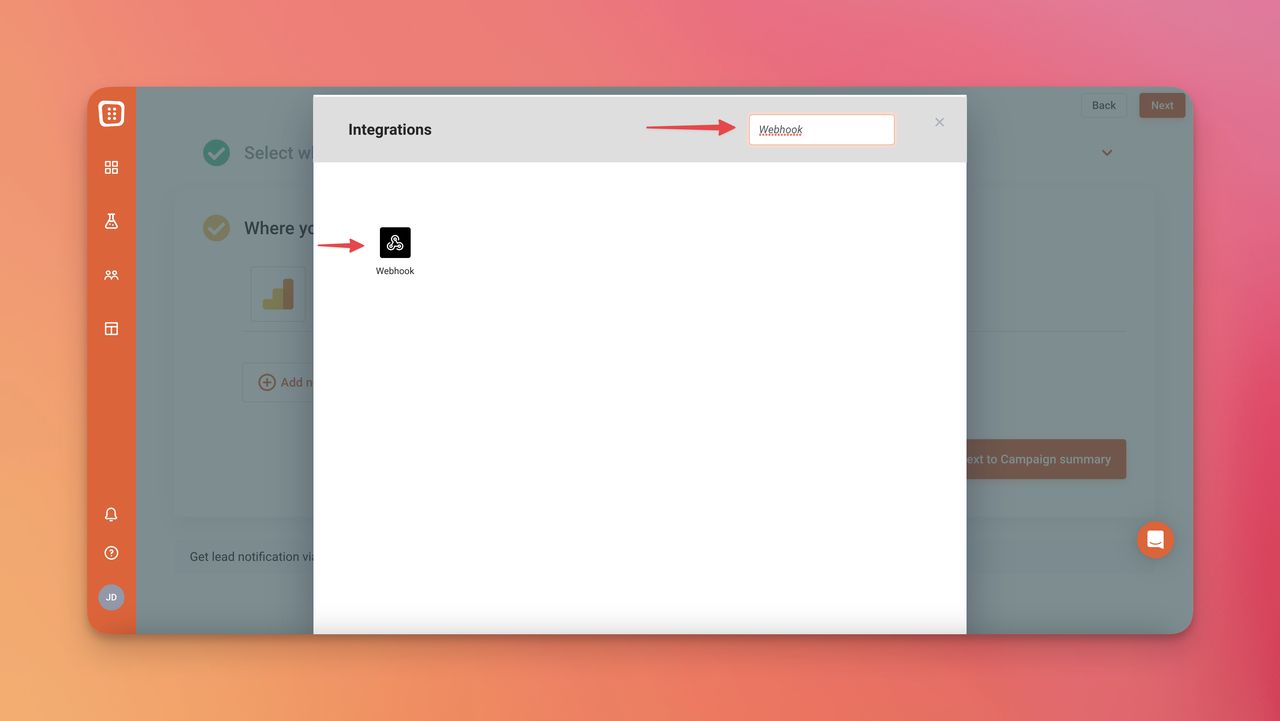
5. From the list of available integrations, select "Webhook" by searching from the bar or browsing.
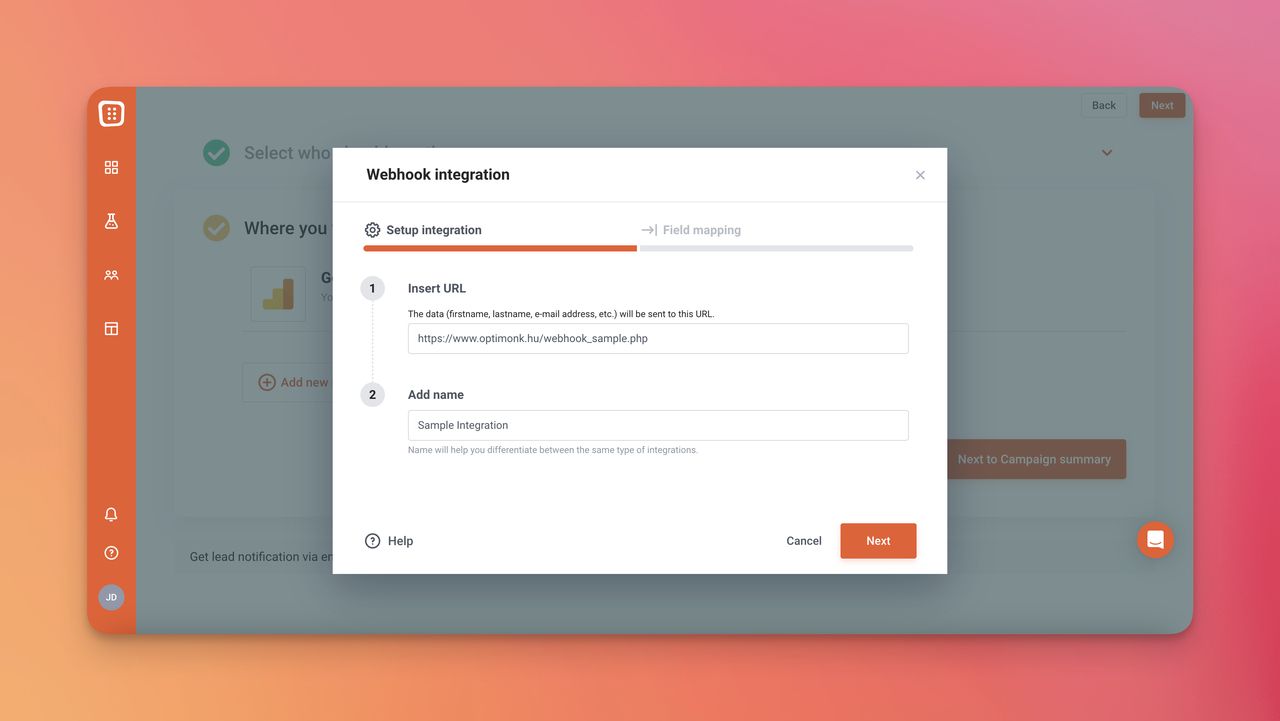
6. Provide a name for the integration and enter the URL of the PHP sample page: "https://www.optimonk.hu/webhook_sample.php" in the designated URL field. Click "Next" to save the changes.
P.S: You need to fill in these fields based on your own information.
7. Now, you need to map the fields between your OptiMonk campaign and the Webhook. After arranging the fields, "Done".
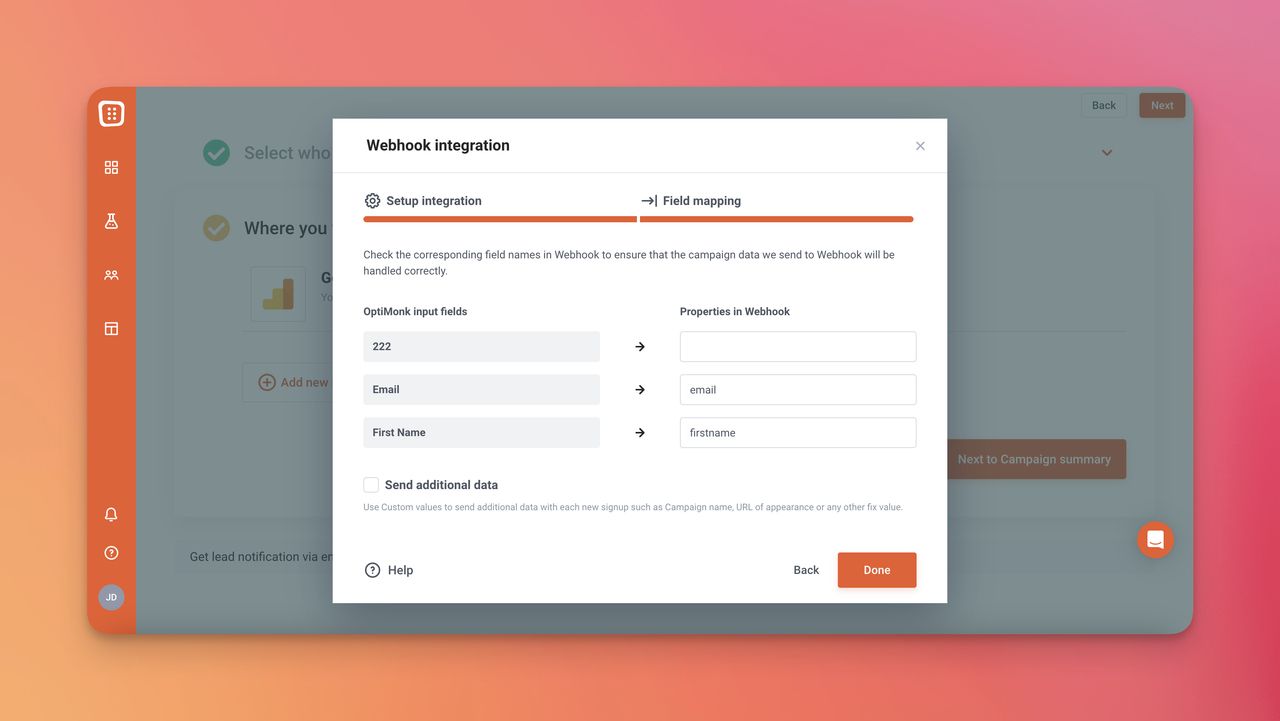
For each input field on your OptiMonk campaign, you can assign a corresponding field in Webhook. This ensures that the data from your OptiMonk campaign will be transferred to the appropriate place in the Webhook.
And your integration is all set up! 🙌🏻
❗️ Please Keep in Mind
To use the Webhook integration, you must code your webpage. If you do not have a developer, you can use Zapier instead, which does not require any coding knowledge to set up.
When using Webhook, there is no need to add any extra markings. Simply provide the subject's name in the input field within OptiMonk.
However, Webhook cannot handle delayed data sending, so if you want to display a multi-signup popup with email and phone input on different pages, you may encounter an integration error in the OptiMonk admin.
In this case, it is recommended to have email and phone input on the same page in your popup.
🙋🏻 How to Test OptiMonk & Webhook Integration
➡ To test the integration, complete a popup form for the campaign on your website that you updated with the Webhook integration.
➡️ Make sure you trigger the campaign that you associated with the Webhook integration.
➡ Verify if the data has successfully arrived in the Webhook by checking the logs on your Webhook page. You should see logs corresponding to the number of pages in your campaign.
➡️ If you want to send additional data beyond what is sent by default, you can utilize incoming Webhooks to receive real-time updates.
Why Integrating OptiMonk and Webhook?
Integrating OptiMonk with Webhook is generally a straightforward process, and it can be both easy and effective. Here are a few reasons why:
- Ease of Integration: OptiMonk provides a user-friendly interface for integrating with Webhook. The step-by-step instructions make it easy to set up the integration without requiring extensive technical knowledge.
- Comprehensive Data Transfer: By integrating OptiMonk with Webhook, you can transfer subscriber and campaign data seamlessly from your OptiMonk campaigns to the designated URL. This ensures that the information collected through your campaigns is efficiently passed on to your Webhook for further processing or integration with other systems.
- Real-time Updates: OptiMonk's integration with Webhook allows you to receive real-time updates through incoming Webhooks. This feature enables you to stay up-to-date with the latest data and take immediate action based on the information received.
- Customizable Data Mapping: With OptiMonk and Webhook integration, you have the flexibility to map fields between your OptiMonk campaign and Webhook according to your specific requirements. This customization ensures that the data is accurately transferred to the corresponding fields in Webhook, allowing for seamless integration with your existing systems.
- Testing and Verification: OptiMonk allows you to test the integration by completing a popup form on your website and verifying if the data is successfully received in the Webhook logs. This testing phase ensures that the integration is functioning as intended before deploying it in a live environment.
Overall, integrating OptiMonk with Webhook is designed to be a user-friendly and effective solution for transferring data from your campaigns to Webhook. It provides a seamless connection between the two platforms, allowing you to optimize your lead generation and marketing efforts effectively.
Extra Tips and Troubleshooting Corner
While integrating OptiMonk with a webhook is generally straightforward, unexpected issues can arise.
By following these extra tips and troubleshooting suggestions, you can enhance the integration experience and resolve any challenges that may occur along the way.
- Test the Integration: After setting up the OptiMonk and webhook integration, it is crucial to test the data transfer. Complete a popup form or trigger the specific event to ensure that the data is successfully sent to the webhook endpoint. Check the webhook logs or response to verify that the data is received correctly.
- Check Field Mapping: Double-check the field mapping between OptiMonk and the webhook. Ensure that the data from your OptiMonk campaign is correctly mapped to the corresponding fields in the webhook. Any discrepancies in field mapping can lead to data misalignment or errors.
- Validate Webhook Endpoint: Verify the webhook endpoint URL to ensure it is correct and accessible. Make sure there are no typos or errors in the URL. Test the endpoint independently to confirm that it is functioning as expected and capable of receiving webhook data.
- Review Security Settings: If the webhook integration fails or encounters issues, check the security settings of your webhook endpoint. Ensure that it allows incoming requests from OptiMonk's servers or the specific IP addresses used by OptiMonk. Adjust any security measures or firewall settings if necessary.
- Monitor Error Logs: Keep an eye on error logs or notifications provided by the webhook endpoint. These logs can provide insights into any issues encountered during data transfer. Analyze the error messages or response codes to identify and address any problems that may arise.
- Contact Support: If you encounter persistent issues or require additional assistance, don't hesitate to reach out to OptiMonk's support team. They can provide specific guidance, troubleshoot problems, and offer solutions tailored to your integration setup.
- Stay Updated: Keep track of any updates or announcements related to OptiMonk and webhook integration. OptiMonk may release new features, enhancements, or bug fixes that can improve the integration process or resolve any known issues.
FAQs Related to the Integration of OptiMonk and Webhook
Can I customize the data mapping between OptiMonk and the webhook?
Yes, you can customize the data mapping between OptiMonk and the webhook. OptiMonk allows you to assign specific fields from your campaign to corresponding fields in the webhook, ensuring the accurate transfer of data.
What events can trigger a webhook integration with OptiMonk?
OptiMonk can trigger webhooks based on various events, such as form submissions, exit-intent captures, specific user actions, or any other event you define within your OptiMonk campaign.
Can I integrate OptiMonk with multiple webhooks?
Yes, OptiMonk allows you to integrate with multiple webhooks simultaneously. You can set up different integrations for various campaigns or choose to send data to different systems based on your requirements.
Can I track the effectiveness of the OptiMonk and webhook integration?
Yes, OptiMonk provides analytics and reporting features to track the performance of your campaigns. Additionally, you can monitor the webhook logs to ensure the data is successfully transferred and processed by the webhook.
Other OptiMonk Integrations
🚀 How to Integrate OptiMonk with BigCommerce
🚀 How to Integrate OptiMonk with Klaviyo
🚀 How to Integrate OptiMonk with Keap
